Saturday, December 24, 2011

Gingerbread Cake and Sauce in Pictures..Photos of the Recipe at Work

The previous post told first of this attempt to bake a gingerbread cake for the Christmas dinner. All was successful and only waits for the herd of in-laws to dig in.   The ladies will bring so many tasty dishes I feared being pummeled by old Brussels Sprouts for attempting to enter their cooking world...again...following the bread pudding of Thanksgiving which was also cooked secretly.  The safe course is to stay out of the kitchen while the ladies cook or prepare the dinner to serve. It depends on the woman but you should take the warning to heart and if she is really busy in the kitchen and talking to herself as she works, you better stay far, far away. If you NEED to be in the kitchen, feel your way carefully and with stealth. 

The safe course for me was to claim the kitchen on Thursday, while my wife was at her job, cooking to my own delight and cleaning up so all was better than when I started.  If the cake totally messed up, no one really needed to know about it. I remember a chocolate cake that fell so flat it looked like brownies...and was served as sticky brownies...successfully. If the gingerbread failed, what happened here would stay here...no intention of serving gingerbread brownies.

Finally cooking a cake again after 20 years was not really the challenge expected.  The recipe was easy to follow and the cake promises to be delicious. (See previous post for a link to the official recipe.) The Gingerbread Cake and zesty lemon sauce will be a surprise at the dinner.
---------------------------------

BAKING GINGERBREAD, FOLLOW THE PICTURES
Recipe comments will be added to the photos as rereading reveals a need.

   
Ingredients for the Gingerbread are below. Note the light corn syrup which was bought to thin the black strap molasses if needed. A dark golden molasses was used instead and the corn syrup was not needed. The jar is now in a corner cupboard with two other jars of corn syrup. The ingredients are: 
  • 1 cup Dark Brown Sugar 
  • 3/4 cup Flavorful Honey(this was dark wildflower) 
  • 3/4 cup Molasses 
  • 2 tsp each Cinnamon and ground Ginger
  • 1/2 tsp Allspice
  • 1/8 tsp Ground Cloves
  • 1 1/2 tsp Baking Soda  
  • 1/2 tsp Salt
  • 1/2 cup Water
  • 3 large Eggs(I like brown free range)
  • 1/2 cup 2% milk
  • 1 cup unsalted butter
  • 3 cups all purpose Flour
  • 1 packed tablespoon grated fresh Ginger Root
  • Enough time on your hands to bake the cake
  • Bake for 45 minutes at 325ºf or until tester inserted into cake comes out dry. (I used a broom straw in three places)
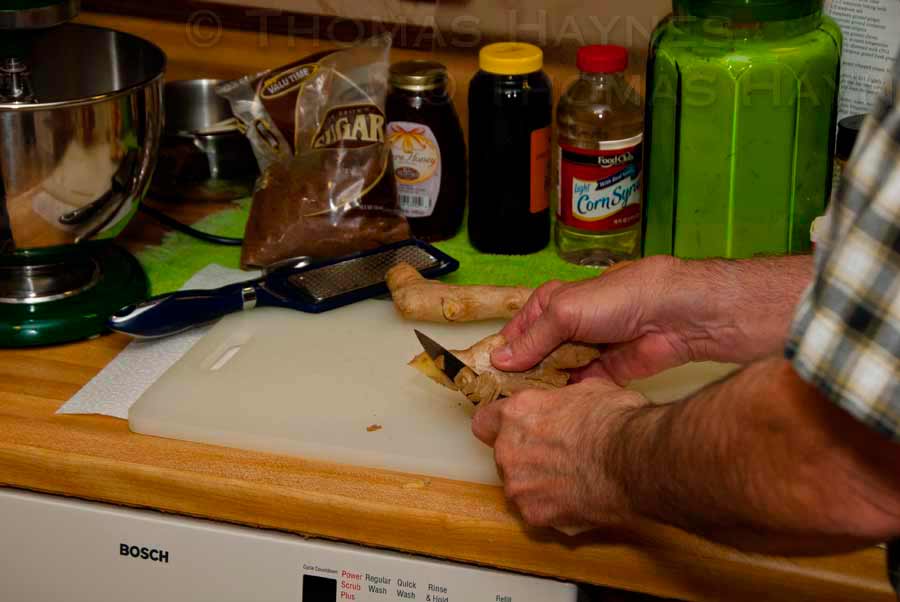

Ginger Root is peeled prior to grating.1 Tablespoon of grated ginger is needed.  The heavy plastic cutting board works very  well as a general work surface and cleans up easily.


A hand held "plane" grater  is used to prepare the ginger root. Enough ginger was grated enough to tightly fill a 1 TBS measure.

Liquid ingredients of molasses, honey and water are stirred in a sauce pan with 1 cup dark brown sugar.  This is heated on low to melt the butter and blend all into the rich mixture it is.  Eggs and milk are added after this mixture has cooled.


Once heat was reached, the butter melted fairly quickly. All was stirred regularly  In the meantime, the dry ingredients were gently sifted, blended and sat aside until called for.

Poured into a mixing bowl to cool, the golden molasses, honey, dark brown sugar and butter mixture  took the appearance of dichroic glass with deep reflective layers to play with the light. This was distracting play for a moment and I understand better why the women don't want me in the kitchen.  The mix should be just warm to the touch prior to adding eggs and milk.  While this cools, turn on the oven to bake at 325ºF.


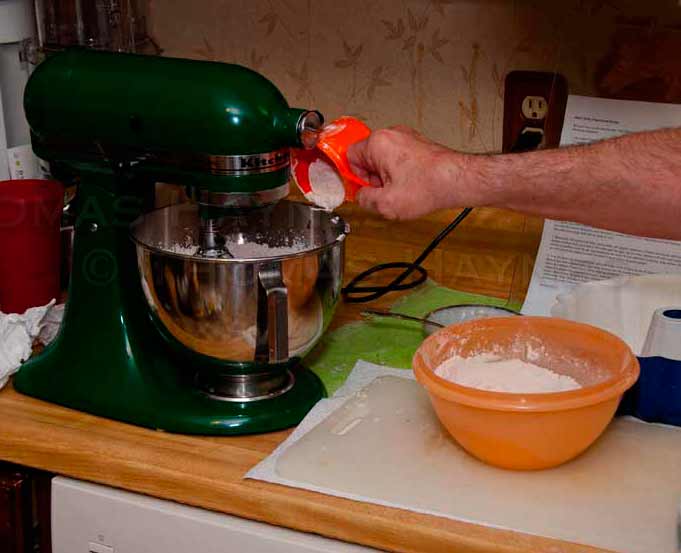
The recipe calls for 3 large eggs and 1/2 cup of  2% milk.The eggs are added first, one at a time, followed with the milk.  The mixer was used to stir all neatly together but it may be done just as well by hand.

If using an electric mixer, run at a slow speed to blend and not froth the mixture. The ginger root was added in separated portions to prevent clumping and allow even distribution.

Add the flour mix in 4 parts, gently blending.  You may prefer to fold the flour into the liquid by hand; if so, use long strokes and fold until mixed nicely. It is not necessary to remove every lump to the very end.

This time a bundt pan was used ( the kind with a stem in the middle).  Grease the pan lightly with vegetable shortening and fully sprinkle with flour.  Turn the pan upside down and tap to remove excess flour.  Now you are ready to pour the batter into the pan.  The oven should be close to the right temperature at this point. Oh, I do wish we had a gas range and oven!

The pan goes on a rack in the center of the oven.  It will bake for 45 minutes and in the meantime, there is something to...


 ------------------------------
This is clean up...a necessary part of the baking task and reality in the kitchen.


----------------------------------

The oven timer went off just now. I have a prepared piece of broom straw to test the cake...inserted here, and there, and there and, yes, it comes out clean. 


The Gingerbread cake cooled in the pan for about 20 minutes.  Placing the plate atop it, all was turned over with hope the cake would release from the pan and gently take its place on the serving plate. Success and the cats only wander in and out; no one is stopping to hear my speech.  Yet deep in me reflects a joy, like that dichroic glass reflection of the molasses, honey and butter.  Happy for the moment!  This is a very good thing.  "Thank you, Lord!"

The post of Gingerbread in Pictures is now done.  As for sauce or icing, so many ways are there for different tastes. Please pick your own, whether a spooned on warm sauce, whipped cream, a sprinkle of powdered sugar or a pour on sugar glaze icing suitable for little petit fours. For the warmed lemon sauce I used, here are the ingredients for 1 1/2 cups of sauce:
  • 1/2 cup fine ground sugar(not powdered sugar)
  • 1 TBS cornstarch
  • 1/4 tsp grated nutmeg(fresh if you have it)
  • a pinch of salt
 To be added last:
  • 1 TBS butter
  • 1 tsp finely grated Lemon Zest (this took 2 lemons, grating only the yellow part of the peel)
  • juice of one lemon

Prepare lemon zest and juice first and set aside. Whisk the dry ingredients together while 1 cup of water comes to a boil, then add to boiling water, stir well and lower heat to a simmer until all thickens.  (The sauce thickens slightly, not so thick as table syrup and pours from a spoon with out drips.)
Add butter, zest and lemon juice, stir to blend  well, remove from heat.  

This sauce may be served to spoon on the gingerbread immediately or rewarmed in a microwave.

The end.
--------------------------

Thomas Haynes is a photographer working out of Clinton, Tennessee, a city just north of Knoxville. His photography is often of a fine arts direction but as in this post, his love of nature takes him again to the Clinch River Raptor Center, a rehabilitation and educational not-for-profit organization.. Visit Thomas and see more of his photography at  Facebook

 Contact Thomas to discuss photography you want done. 

Thursday, December 22, 2011

Gingerbread Cake of the Tastiest Sort, Dark and Sticky, In Time for Christmas

Today I found no job opportunities to pursue and in celebration of life baked a cake, the first one since I married a wonderful lady over 20 years ago. Almost a year out of work deserves a cake and she will have the chance to see if I truly can bake a tasty one. With attention to the recipe  most anyone blessed with the ingredients, a cake pan, an oven and the time can very, very likely make this cake.

Following instructions is the key and the weak link in the chain. You will find this recipe easy to follow.
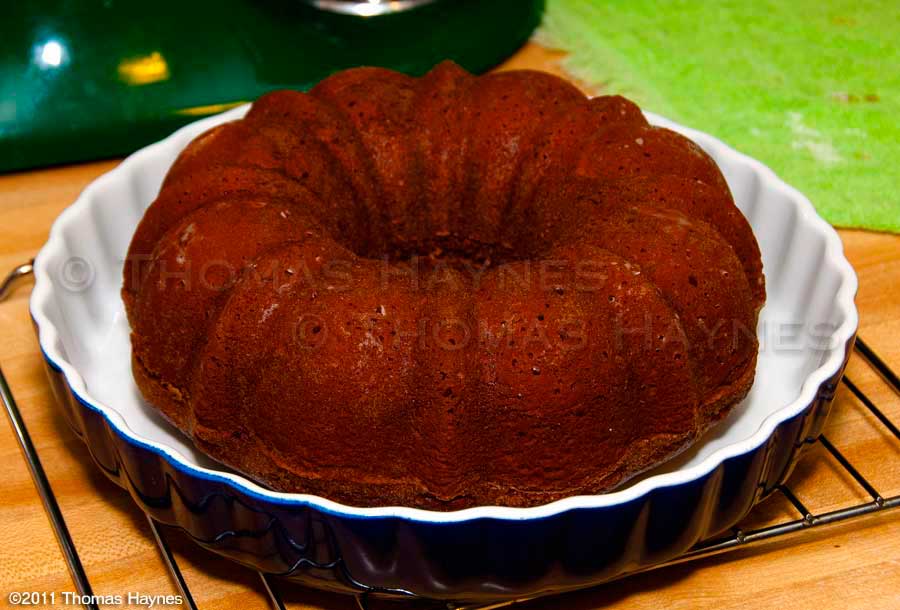
 Straight from the oven, the surface is delightful and the aroma is quite rich.

Had I known how inviting the gingerbread would look on top when baked, I might have used a rectangular pan instead of the bundt.  This would allow the appealing texture to show.  When turned over and out of the pan, the bundt shape is there but the wonderful crust texture does not glisten as much. If you want to dress up the bundt cake, a poured on thin icing will do nicely. In my case, the choice is no icing and a warmed lemon sauce spooned on each slice served.

The original recipe called for  unsulfured black strap molasses but a dark golden variety was substituted. The stronger flavored and darker blackstrap mollasses would possibly yield the darker gingerbread after which the recipe is named. If you prefer a less intense flavor, the lighter mollasses as used will do very well.

Would a seasoned baker or even candle stick maker know better than to use a quiche dish for a cake plate?  Getting the knife in there to serve the gingerbread will take a special maneuver! 
This dish adds a festive accent to the traditional Christmas desert. 


Baking Gingerbread in photographs with comments will be next on this blog...from ingredients to stirring, mixing, pouring and even the clean and shiny dishes and measuring cups all washed and ready for the next cooking adventure. Come back in a few days and see the gingerbread rise from a few disinterested ingredients to become a super cake!  That is a cheer for teamwork.
----------------------------------- 
Thanks to Heidi Swinson and her wonderful recipes:   A December 11,2011 post of her revised recipe is here:

My hero and my salvation is always Christ. At this time of the year we think more of the family of Joseph and Mary, making the best of very simple surroundings for the birth of their child. Employed or not, I say thanksgiving for all the blessings in my family. I see many  people in more unpleasant situations and in dire straits. For those, there is special prayer this Christmas season.

MERRY CHRISTMAS TO ALL AND 
TO ALL A BLESSED DAY
AND HOLY CHRISTMAS SEASON!


Wednesday, November 30, 2011

The Clinch River Raptor Center is Exceptional

This post is for new readers who may not have seen the photos and read the stories of birds of prey contained in this blog. Postings carry subject titles: Look for "Raptors and Raptor Rehab" in the categories list a short scroll down the right column. Click there to open links to several posts about the birds. You will see photos of owls, hawks and even vultures.  The long term resident hawks and owls are pictured and you should find those photographs for the most part beautiful, entertaining and educational. 

 This Barn Owl had a broken wing and was very weak
when first brought to the center. The caretaker and veterinarian 
did not think it would live.

 
Whether Barred owls,  little Eastern Screech Owls, enticing and fierce appearing Great Horned Owls or the Barn Owls, focused determined hunters with white wings giving an almost angelic appearance... these will be at the Clinch River Raptor Center from time to time.  The birds are there to heal and be returned to the wild after some tragic event could have cost their lives. Fortunate rescued birds have injury or illness which will respond to treatment and the bird can recover and be set free.   The unfortunate are too badly injured, sick or malnourished to survive but do get a chance to live they would not have if left in the wild.  When a bird must be euthanized,  it will go to sleep and pass on in peace with out the suffering inflicted by death in the wild.

The same applies to the day hunters, the hawks rescued and living at the Clinch River Raptor Center.  Hawks and other day hunting raptors within the area served by the center generally include the smallest falcons, Kestrels. A summer ago the center was a nursery for several groups of these small hunters with 8 to 12 kestrels all chirping for food.  These birds were healthy but without parents or a natural home,  Having left their nests for some reason and unable to return, the youngsters were raised, taught to hunt and when ready were released.  The same summer saw a large population of baby screech owls...natural comedians and in a group of 12 the cuteness was almost too much and we all were amused. Still, each would find its own way in the wild once grown enough to release.

This is the same Barn Owl many weeks later.  The bird had  an amazing recovery and gained full use of the broken wing, an unexpected result. The tireless and constant care of dedicated staff
led to one fine day when the bird was released on a farm with much open land.  
The owl made a home in a barn there.

A great many of the raptors brought to the center are healed and set free.  Always it is an exciting and joyful event to see a bird fly to freedom and back to the life nature intended. The rehabilitation worked!   A rare few are injured in a way that will heal but still will not allow the bird to survive in nature. For instance, a bird with damaged eyesight or a broken wing which healed but will not support active flight can not be returned to the place it once claimed  home in nature. These birds are trained to be educational raptors, being part of programs designed to promote knowledge of the raptors and ultimately welfare for the birds in the wilds of nature itself, nature often being forced into coexistence and land sharing with human invasion.  Educational birds have a home for life at the Clinch River Raptor Center.   They receive excellent care and are able to carry on with their particular disability.
 This Osprey was found struggling and almost dead near a lake. Fortunately, the bird responded to treatment and was released to fly free at a lake where it might have less competition.  Sometime previously,  another Osprey was found shot and also near death.  At first it was believed to be the male of a nesting pair then raising chicks.  With only the mother to care for the babies, chances of survival were slim.  The bird gave it all but died from its wound. As for the nesting birds, the male showed up soon after and we realized the bird that died was a different Osprey.  The nesting birds are regular every year, using the same nest atop a power line tower overlooking the lake. A few nest repairs are made and  each year they raise new chicks. That shooter took the life of one magnificent bird. Had that bird been the male from the active nest, the toll would have been one adult and two chicks, all for a "little fun" shooting at birds...an illegal act, certainly.
(I must apologize for the poor quality of this photograph.)
 

The Clinch River Raptor Center sets free the minds of children,  giving them a small glimpse into the real world of nature and birds of prey.  Located in a middle school, volunteer students spend part of a school year after classes visiting the center. There they learn about hawks, owls, occasional vultures and other birds more rarely like the Osprey. 

The students learn how to clean cages and feed the birds. While most birds are fed dead mice, special diets must match the natural food of the particular bird. The Osprey got fish..talapia from a local market! Penguins eat fish and smell like fish. So do Ospreys.

A few of the students are able to take part in educational events, holding a raptor on a gloved hand to be seen and appreciated.   How many middle school students have held an adult Barred Owl, Eastern Screech Owl or Red Tailed Hawk?  Those who have do not forget the experience and carry with them an honest appreciation of nature, an appreciation that remains through future years.

To me, the birds of prey are another of the creations of God, misunderstood by many people but bound to interact some place, some way. I now see the second part of that statement applies to the critters of nature and also to the nature of God.


Friday, November 25, 2011

Bread Pudding,,a Holiday Delight Dessert Style with Nuts and Chocolate

This is my first time to cook bread pudding. I chose ingredients for a dessert style. As I understand, this type of pudding came about as a means to use old bread and let none go to waste.  The dish varies greatly from culture to culture. I have found people either like it or absolutely will not even take a bite...the same way some people avoid fine cheesecake and miss a true culinary delight.   This particular recipe is a basic form with my choice of added ingredients.  Feel free to add you own personal touches such as berries, etc., staying aware not to add much excess liquid which could make the dish too wet and the custard not properly cooked. 
Shown below, a dollop of sherbet adorns the pudding. At Thanksgiving dinner, it was served warm topped with fresh whipped cream. 

 Bread Pudding...a fine Holiday Treat


Here is the recipe, serving 4 to 8, depending on 
your spoon and generosity:
Ingredients
  • 2  3/4 cups cubed day old French bread
  • 4 eggs,med (no-cage brown eggs if you have them)
  • 1/2 cup white sugar
  • 1 teaspoon vanilla extract
  • 1cup milk
  • 1 cup heavy cream
  • 1 pinch ground nutmeg
  • 1 pinch allspice
  • 1 1/2 tablespoon dark brown sugar
  • 1/2 cup nuts, chopped (optional walnuts, pecans)
  • 1/4 cup white chocolate, chips or chopped
  • 8 inch square baking dish
Directions
1.    Butter baking dish well.
2.    Place bread cubes in the baking dish, sprinkle on nuts and chocolate holding back some to sprinkle on after liquid is added.
3.    In a medium bowl, beat together eggs, sugar, and vanilla. Slowly whisk in the milk and cream. Stir in pinch allspice. Pour over the bread. (Taste at this point for spices.) Let set for 25 min while oven heats up.*  (Taste again.) Press bread as needed to keep well into liquid.
4.    Sprinkle with nutmeg, brown sugar, remaining nuts and chocolate. 
5.    Preheat oven to 300 degrees F (150 degrees C)*.
6.    Prepare a water bath for the baking dish by partially filling a larger dish with hot water.
7.    Place the baking dish in the water bath. Bake for 50 to 60 minutes, or until a knife inserted in the middle comes out clean. Serve either hot or chilled. 


French Bread...some call it a Baguette.  The dough style is regulated in France but not particularly the shape.  This is hard bread and wonderful for many uses. Why mention it? Depending on your knives and keenness of edge, you may need a serrated blade to quickly cut the baguette.  Cut into slices about 1/2 inch thick then cut across twice to cube.  As you can see, I was rescued by a Japanese Dozuki saw and made short work of the bread and the cutting board!  (Not wanting anyone without a dozuki to feel left out preparing this dish, use a sharp serrated or very sharp knife of your choice, like I really did.)

 The hard French Bread was cut into cubes the
day before and put into a plastic bag left
open and placed in the refrigerator.
This way it was both day old and pristine.
The Recipe Is Above. Simply follow it along.  The photos below illustrate the steps in making your bread pudding...

Bread with custard liquid added and sprinkled 
with nuts and chocolate


A smaller dish was used to press the bread into the liquid.  Allow to soak about 25 minutes and turn on the
oven to preheat during this time

 The pudding before baking


Water bath used for gentle baking 
of the custard mixture

In the oven, ready to bake
The bread pudding straight from the oven


There it is...  This festive holiday bread pudding is a tasty morsel and really quite easy to prepare


A word to the wise:  I knew the flavors would blend and work to fullness overnight in the refrigerator.  That did happen with one surprise:  Black Walnut Take Over!

English walnuts would not have done it and neither would the pecans.  Those costly black walnuts raised a level of determination to be noticed and when reheated on Thanksgiving Day, it was almost a black walnut takeover.  I had been concerned about using too much allspice..no problem with any of the spices and the flavor there was wonderful.  As for the black walnuts, lets simply say there was no hiding in the background or in the bouquet to those nuts.  It was delicious and the walnuts tasted bold and fine.  What I learned was not to use any more than I did the next time a holiday bread pudding is to be made.

Reheating:  This must be a gentle process to keep the custard from becoming too thick.  You can use a water bath in the oven at a low temperature, checking often on the warmth of the pudding.  If in a microwave proof dish, simply reheat in the microwave.  I did this one for about 8 minutes at 30% power, checking often and adding a minute as needed.  Low power must be used in reheating. 
_____________________________

Your contribution..do you have a variation of bread pudding to share? Please e-mail me (link at page top right). 

Monday, November 21, 2011

Where is GOD? The final page is written

Posting will continue soon after the American holiday of Thanksgiving is passed. The first post will be BREAD PUDDING, my cooking illustrated.  Certainly chefs of New Orleans and Birmingham or Yorkshire will be thrilled at this take on the old simple dish for using up left over bread...or they will certainly not be thrilled and turn away with a sigh.  For readers here, the photos should be interesting enough on this first attempt at the dish. I will report on the "taste" based on reception by in-laws and outlaws tomorrow at the dinner, each one a critic of sorts.

See the tabs above at header to read strangely different thoughts on a search for God. I got into the subject and twisted about in there. It is now concluded for what it may be worth.  Any thoughts you have will be appreciated.

The page on  "Rescued Pets" and Cats living in this household will be next to fill out.  I have been too concerned of necessity with other events to write effectively as I would like. The stories of the cats deserve to be written and done so to hold interest and provide a touch of humor here and there in the mix. There is joy and stuff to giggle over and with honesty there is sadness and reality.  The photos are being made of the present cats;  those of cats passed on are gathered and being re-edited as needed. The time has come to do that page.
Your Story
E-mail me your rescued pet story if you want. I might find a way to publish it here.

Tuesday, November 8, 2011

Fallen Hostas, Fall is Leaving Us,,,

When winter approaches, the leaves lean closer to the earth each day. When all are hugging the earth around them, the color becomes a lovely yellow, a color hidden all summer and now a joyful way to end a summer and say goodbye for the season.

 Hostas, a natural greeting to winter and good bye to autumn
Joyful, joyful for each season...and to live where each  has its own distinctive vision and touch to our skin...that is good. Winter is coming.